Table of contents目次
- Contents of IPLROM 1.6IPLROM 1.6の内容
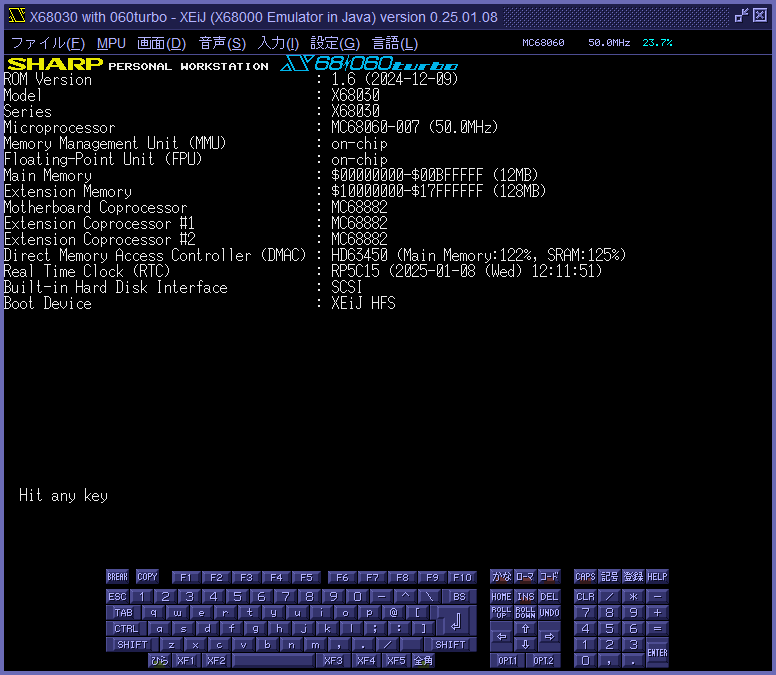
- Startup screen 起動画面
- Keys that are effective when pressed at startup 起動時に押していると効果のあるキー
- Extension of IOCS _CRTMOD IOCS _CRTMODの拡張
- Configuration of IPLROM 1.6 IPLROM 1.6の構成
- Selecting IPLROM IPLROM の選択
- Building ROM ROM の構築
- Model name and model code 機種名と機種コード
- How to use IPLROM 1.6 on real machines or other X68000 emulators 実機または他のX68000エミュレータでIPLROM 1.6を使う方法
- How to create CGROM30.DAT CGROM30.DATの作り方
1. Contents of IPLROM 1.6 IPLROM 1.6 の内容
IPLROM 1.6 consists of SCSIINROM 16, ROM Human 2.60, ROM FLOAT 2.03, ROM Debugger 3.60 or ROM Debugger 1.0, ANK6x12, SASI BIOS, and IPL/BIOS 1.6. IPLROM 1.6 は、SCSIINROM 16、ROM Human 2.60、ROM FLOAT 2.03、ROM デバッガ 3.60またはROM デバッガ 1.0、ANK6x12、SASI BIOS、IPL/BIOS 1.6から成ります。
1.1. SCSIINROM 16
SCSIINROM 16 is based on SCSI BIOS 4 in FORMAT.X, SCSI BIOS 10 in X68030, and so on. SCSIINROM 16 は FORMAT.X に含まれる SCSI BIOS 4 および X68030 の SCSI BIOS 10 などを元にしています。
1.2. ROM Human 2.60
ROM Human 2.60 is based on Human68k 3.02. ROM Human 2.60 は Human68k 3.02 を元にしています。
Like ROM Human 2.15, ROM Human 2.60 has the ability to read ROM FLOAT instead of FLOATn.X written to the device in CONFIG.SYS. Also, the initial value of scsidev has been changed to off. ROM Human 2.15 と同様に、ROM Human 2.60 には CONFIG.SYS の device に書かれた FLOATn.X の代わりに ROM FLOAT を読み込む機能があります。また、scsidev の初期値が off に変更されています。
1.3. ROM FLOAT 2.03
ROM FLOAT 2.03 is FLOAT2.X 2.03. ROM FLOAT 2.03 は FLOAT2.X 2.03 です。
1.4. ROM Debugger 3.60 ROM デバッガ 3.60
ROM Debugger 3.60 is based on DB.X 3.00. ROM デバッガ 3.60 は DB.X 3.00 を元にしています。
It can also be activated on 68060. 68060 でも起動できます。
CON mode has been added. The ROM debugger is operated from a terminal connected via RS-232C in the conventional AUX mode, but in CON mode, the ROM debugger is operated from the X68000 screen and keyboard. CON モードを追加しました。従来の AUX モードのときは RS-232C 経由で接続されたターミナルから ROM デバッガを操作しますが、CON モードのときは X68000 の画面とキーボードで ROM デバッガを操作します。V コマンドで AUX モードと CON モードを切り替えられます。
The ROM debugger start flag ($00ED0058) in SRAM is set to $00 for OFF, $FF for AUX, and $01 for CON. switch d=off sets the flag to OFF, switch d=on sets the flag to AUX. SRAM にある ROM デバッガ起動フラグ ($00ED0058) の設定値は、$00 が OFF、$FF が AUX、$01 が CON です。switch d=off でフラグが OFF に、switch d=on でフラグが AUX になります。
If the OPT.2 key is pressed at startup, the flag changes to AUX if the flag was OFF or CON, and the flag changes to OFF if the flag was AUX. If the D key is pressed at startup, the flag changes to CON if the flag was OFF or AUX, and the flag changes to OFF if the flag was CON. Note that the effect of the OPT.2 key has changed from temporary to permanent. 起動時に OPT.2 キーが押されていると、フラグが OFF または CON だったときはフラグが AUX に、フラグが AUX だったときはフラグが OFF に変化します。起動時に D キーが押されていると、フラグが OFF または AUX だったときはフラグが CON に、フラグが CON だったときはフラグが OFF に変化します。OPT.2 キーの効果が一時的なものから永続的なものに変更されていることに注意してください。
ROM debugger 2.32 and DB.X 3.00/3.02 defects listed here have been largely fixed in db350.x and ROM Debugger 3.60. こちらに記載されている ROM デバッガ 2.32 と DB.X 3.00/3.02 の不具合は db350.x と ROM デバッガ 3.60 では概ね修正されています。
1.5. ROM Debugger 1.0 ROM デバッガ 1.0
ROM Debugger 1.0 is based on IPLROM 1.2. ROM デバッガ 1.0 は IPLROM 1.2 を元にしています。
1.6. ANK6x12
ANK6x12 is based on IPLROM 1.2. ANK6x12 は IPLROM 1.2 を元にしています。
IPLROM 1.3 uses ANK6x12 in the X68030 CGROM, so combining IPLROM 1.3 with an X68000 CGROM that does not contain ANK6x12 will cause problems with SX-WINDOW and other applications that cannot display ANK6x12. Since replacing CGROM is more difficult than replacing IPLROM on an actual X68000 machine, IPLROM 1.6 avoids this problem by carrying ANK6x12 internally and using it as in IPLROM 1.0 to 1.2. IPLROM 1.3 は X68030 の CGROM にある ANK6x12 を使うため、IPLROM 1.3 と ANK6x12 が入っていない X68000 の CGROM を組み合わせると SX-WINDOW などで ANK6x12 が表示されないという問題が起こります。X68000 実機では IPLROM の交換よりも CGROM の交換の方が難しいので、IPLROM 1.6 では IPLROM 1.0~1.2 と同様に ANK6x12 を内部に抱えてそれを使うようにすることでこの問題を回避しています。
1.7. SASI BIOS
SASI BIOS is based on IPLROM 1.2. SASI BIOS は IPLROM 1.2 を元にしています。
It is patched to increase the number of loops until timeout depending on the speed of the MPU. MPU の速さに応じてタイムアウトまでのループ回数を増やすパッチを当ててあります。
1.8. IPL/BIOS 1.6
IPL/BIOS 1.6 is based on IPLROM 1.3. IPL/BIOS 1.6 は IPLROM 1.3 を元にしています。
2. Startup screen 起動画面
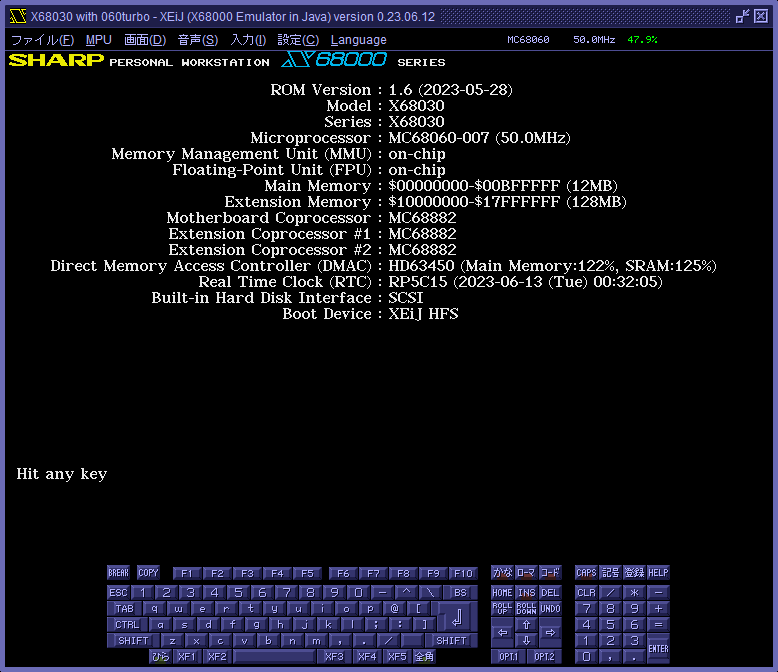
The IPLROM 1.6 startup screen displays a variety of information. If you hold down the L key or the N key or the V key while starting up, the startup screen will display "Hit any key" and pause so you can calmly take a picture. Starting up while holding down the Q key will enter a mode in which the startup screen is not displayed. IPLROM 1.6 の起動画面には様々な情報が表示されます。L キーまたは N キーまたは V キーを押しながら起動すると起動画面に Hit any key と表示されて一時停止するので落ち着いて撮影できます。Q キーを押しながら起動すると起動画面を表示しないモードになります。
- IPLROM 1.6 version and date IPLROM 1.6 のバージョンと日付
- Model name as recorded at the end of IPLROM 1.6 IPLROM 1.6 の末尾に記録されている機種名
- X68000 series or X68030 series identified by system port システムポートで判別された X68000 シリーズまたは X68030 シリーズ
- MPU type and operating frequency MPU の種類と動作周波数
- MMU availability MMU の有無
- FPU availability FPU の有無
- Main memory range and capacity メインメモリの範囲と容量
- Extension memory range and capacity 拡張メモリの範囲と容量
- Availability and type of motherboard coprocessor accessible from MC68060 MC68060 からアクセスできるマザーボードコプロセッサの有無と種類
- Availability and type of numerical processor board 数値演算プロセッサボードの有無と種類
- DMAC transfer rate measured in main memory and battery-backed SRAM メインメモリとバッテリバックアップ SRAM で計測した DMAC の転送速度
- RTC date and time and presence of anomalies RTC の日時と異常の有無
- Internal hard disk interface type 内蔵ハードディスクインターフェイスの種類
- Boot device 起動デバイス
2.1. Logo and style ロゴとスタイル
You can change the X68000 logo on the IPLROM 1.6 startup screen. Specify the file name of the TEXTPUT format data or the ROM image file name in the parameter x68000logo. The logo height is 16 dots, the standard width is 112 dots, and the upper limit is 208 dots. If the logo width is larger than the standard, the string "SERIES" will not be displayed. To use the 060turbo logo, the ROM of the actual 060turbo machine is required. IPLROM 1.6 の起動画面の X68000 ロゴを変更できます。TEXTPUT 形式のデータのファイル名または ROM イメージファイル名を、パラメータ x68000logoに指定します。 ロゴの高さは 16 ドット、幅は標準が 112 ドット、上限が 208 ドットです。 ロゴの幅が標準より大きいとき、文字列「SERIES」は表示されません。060turbo のロゴにするには 060turbo 実機の ROM が必要です。
You can change the style of the IPLROM 1.6 startup screen. The proportional pitch is 1, centered is 2, with gaps is 4, and the sum of these is specified in the parameter iplrom16style. The default is 7. IPLROM 1.6 の起動画面のスタイルを変更できます。 プロポーショナルピッチを 1、中央寄せを 2、隙間ありを 4 として、それらの合計をパラメータ iplrom16styleに指定します。 デフォルトは 7 です。
3. Keys that are effective when pressed at startup 起動時に押していると効果のあるキー
3.1. CLR key CLR キー
The following message is displayed and the entire SRAM is zero-cleared when the Y key is pressed. 以下のメッセージが表示され、Y キーを押すと SRAM の全体がゼロクリアされます。
S-RAMを初期化します。
よろしいですか?(Y/N)
3.2. CTRL key CTRL キー
Ejects floppy disks without reading them even if they are loaded. フロッピーディスクがセットされていても読まずにイジェクトします。
3.3. HELP key HELP キー
A hard disk partition selection screen will appear, but this is not a function of IPLROM. ハードディスクのパーティション選択画面が表示されますが、これは IPLROM の機能ではありません。
3.4. L key L キー
Switch to the sync frequency for LCDs. When the actual X68000 is connected to a standard LCD monitor, the problem of the 768x512 dot screen stretching vertically and the bottom edge sticking out is solved. The startup screen is paused with a "Hit any key" message to make it easier to take pictures of the startup screen. LCD 向けの同期周波数に切り替えます。X68000 実機を一般的な液晶モニタに接続したとき 768x512 ドットの画面が縦に伸びて下端がはみ出してしまう問題が解消されます。 起動画面を撮影しやすいように Hit any key と表示して一時停止します。
3.5. N key N キー
Switch to sync frequency for CRT. The startup screen is paused with a "Hit any key" message to make it easier to take pictures of the startup screen. CRT 向けの同期周波数に切り替えます。 起動画面を撮影しやすいように Hit any key と表示して一時停止します。
3.6. OPT.1 key OPT.1 キー
Ignore the highest priority boot device setting at $00ED0018 in the battery-backed SRAM and boot with standard priority. The standard priority is as follows. バッテリバックアップ SRAM の $00ED0018 にある最優先起動デバイスの設定を無視して標準の優先順位で起動します。 標準の優先順位は以下の通りです。
- Floppy disk フロッピーディスク
- SASI hard disk SASI ハードディスク
- ROM including SCSI hard disk and CD-ROM SCSI ハードディスクおよび CD-ROM を含む ROM
- RAM including battery-backed SRAM バッテリバックアップ SRAM を含む RAM
3.7. OPT.2 key OPT.2 キー
When the OPT.2 key is pressed at startup, the ROM debugger start flag at $00ED0058 in the battery-backed SRAM changes to AUX if the flag was OFF or CON, and the flag changes to OFF if the flag was AUX. Note that the effect of the OPT.2 key has changed from temporary to permanent. 起動時に OPT.2 キーが押されていると、バッテリバックアップ SRAM の $00ED0058 にある ROM デバッガ起動フラグが OFF または CON だったときはフラグが AUX に、フラグが AUX だったときはフラグが OFF に変化します。OPT.2 キーの効果が一時的なものから永続的なものに変更されていることに注意してください。
3.8. D key D キー
When the D key is pressed at startup, the ROM debugger start flag at $00ED0058 in the battery-backed SRAM changes to CON if the flag was OFF or AUX, and the flag changes to OFF if the flag was CON. 起動時に D キーが押されていると、バッテリバックアップ SRAM の $00ED0058 にある ROM デバッガ起動フラグが OFF または AUX だったときはフラグが CON に、フラグが CON だったときはフラグが OFF に変化します。
3.9. Q key Q キー
Starting up while holding down the Q key will enter a mode in which the startup screen is not displayed. This mode is released by starting up while holding down the L, N, or V key. This mode is stored in bit 1 of $00ED0095 in the battery-backed SRAM. Q キーを押しながら起動すると起動画面を表示しないモードになります。 このモードは L キー、N キー、V キーのいずれかを押しながら起動すると解除されます。 このモードはバッテリバックアップ SRAM の $00ED0095 のビット 1 に保存されます。
3.10. T key T キー
Switches to low-resolution mode. 低解像度モードに切り替えます。
3.11. V key V キー
Switch to VGA mode. The startup screen is paused with a "Hit any key" message to make it easier to take pictures of the startup screen. VGA モードに切り替えます。 起動画面に Hit any key と表示して一時停止します。
3.12. XF1 key XF1 キー
Turn off the cache when X68030. When X68030, write the value in $00ED0092 or $0A in the battery-backed SRAM to system port $00E8E009 to insert wait cycles for main memory and ROM accesses to achieve an operating speed equivalent to 10MHz X68000. X68030 のときキャッシュを OFF にします。X68030 のときバッテリバックアップ SRAM の $00ED0092 にある値または $0A をシステムポート $00E8E009 に書き込んでメインメモリと ROM のアクセスにウェイトサイクルを挿入することで 10MHz の X68000 相当の動作速度にします。
3.13. XF2 key XF2 キー
Turn off the cache when X68030. When X68030, write the value in $00ED0093 or $04 in the battery-backed SRAM to system port $00E8E009 to insert wait cycles for main memory and ROM accesses to achieve an operating speed equivalent to 16MHz X68000. X68030 のときキャッシュを OFF にします。X68030 のときバッテリバックアップ SRAM の $00ED0093 にある値または $04 をシステムポート $00E8E009 に書き込んでメインメモリと ROM のアクセスにウェイトサイクルを挿入することで 16MHz の X68000 相当の動作速度にします。
3.14. XF3 key XF3 キー
Turn off the cache when X68030. When X68030, write the value in $00ED0092 or $0A in the battery-backed SRAM to system port $00E8E009 to insert wait cycles for main memory and ROM accesses to achieve an operating speed equivalent to 10MHz X68000. Start ROM Human 2.60. X68030 のときキャッシュを OFF にします。X68030 のときバッテリバックアップ SRAM の $00ED0092 にある値または $0A をシステムポート $00E8E009 に書き込んでメインメモリと ROM のアクセスにウェイトサイクルを挿入することで 10MHz の X68000 相当の動作速度にします。 ROM Human 2.60を起動します。
3.15. XF4 key XF4 キー
Turn off the cache when X68030. When X68030, write the value in $00ED0093 or $04 in the battery-backed SRAM to system port $00E8E009 to insert wait cycles for main memory and ROM accesses to achieve an operating speed equivalent to 16MHz X68000. Start ROM Human 2.60. X68030 のときキャッシュを OFF にします。X68030 のときバッテリバックアップ SRAM の $00ED0093 にある値または $04 をシステムポート $00E8E009 に書き込んでメインメモリと ROM のアクセスにウェイトサイクルを挿入することで 16MHz の X68000 相当の動作速度にします。 ROM Human 2.60を起動します。
3.16. XF5 key XF5 キー
Start ROM Human 2.60. ROM Human 2.60を起動します。
4. Extension of IOCS _CRTMOD IOCS _CRTMOD の拡張
4.1. Added screen modes 追加された画面モード
IOCS _CRTMOD in IPLROM 1.6 adds screen modes that are not in the standard, such as 384x256 dots and near-square mode with 512x512 and 256x256 dots. IPLROM 1.6 の IOCS _CRTMOD には、384x256 ドットや、512x512 ドットと 256x256 ドットで正方形に近いモードなどの、標準にない画面モードが追加されています。
Direct operation of the CRTC is cumbersome, so it would be convenient to switch to the added screen modes simply by calling IOCS _CRTMOD. CRTC の直接操作は面倒なので、IOCS _CRTMOD を呼び出すだけで追加された画面モードに切り替えられると便利です。
Even in non-IPLROM 1.6 environments, the added screen modes can be used by making crtmod16.x resident. IPLROM 1.6 ではない環境でも、crtmod16.xを常駐させることで、追加された画面モードを利用できるようになります。
4.2. sync frequency for LCD LCD 向けの同期周波数
When an actual X680x0 device is connected to a common LCD monitor, the 768x512-dot screen often stretches vertically and the bottom edge protrudes. This problem can be solved by writing IPLROM 1.6 into ROM, placing it on the actual X680x0 device, and booting it while pressing the L key. X680x0 実機を一般的な液晶モニタに接続すると、768x512 ドットの画面が縦に伸びて下端がはみ出してしまうことがよくあります。IPLROM 1.6 を ROM に書き込み、X680x0 実機に載せて、L キーを押しながら起動することで、この問題を解消できます。
If D1.W=$43xx is given to IOCS _CRTMOD in IPLROM 1.6, it will switch to the sync frequency for CRT and D1.W=$4Cxx will switch to the sync frequency for LCD. IPLROM 1.6 の IOCS _CRTMOD に D1.W=$43xx を与えると CRT 向けの同期周波数に切り替わり、D1.W=$4Cxx を与えると LCD 向けの同期周波数に切り替わります。
The choice of sync frequency for CRT or LCD is stored in SRAM, where bit 0 of $00ED0095 in SRAM means that the sync frequency for CRT is selected, and 1 means that the sync frequency for LCD is selected. CRT 向けの同期周波数と LCD 向けの同期周波数の選択は SRAM に保存されます。SRAM の $00ED0095 のビット 0 が 0 のときは CRT 向けの同期周波数が、1 のときは LCD 向けの同期周波数が選択されていることを意味します。
Resetting with the L key held down switches to the sync frequency for LCD, and resetting with the N key held down returns to the sync frequency for CRT. L キーを押しながらリセットすると LCD 向けの同期周波数に切り替わり、N キーを押しながらリセットすると CRT 向けの同期周波数に戻ります。
This function is achieved by making the sync frequency output by the CRTC closer to SVGA. It is not effective for games where the sync frequency cannot be changed or will not work properly if it is changed. この機能は CRTC が出力する同期周波数を SVGA に近づけることで実現しています。 同期周波数を変更できないあるいは変更すると正常に動作しないゲームには効果がありません。
4.3. List of screen modes 画面モードの一覧
| apparent screen size画面サイズ | real screen size実画面サイズ | number of colors色数 | number of pagesページ数 | screen mode画面モード | for CRTCRT 向け | for LCDLCD 向け | note備考 | ||
|---|---|---|---|---|---|---|---|---|---|
| horizontal sync水平同期 | vertical sync垂直同期 | horizontal sync水平同期 | vertical sync垂直同期 | ||||||
| 256x256 | 512x512 | 16 | 4 | 6 | 31.500kHz | 55.458Hz | 34.500kHz | 55.200Hz | read raster twiceラスタ 2 度読み |
| 256 | 2 | 10 | |||||||
| 65536 | 1 | 14 | |||||||
| 1024x1024 | 16 | 2 | |||||||
| 256* | 50* | ||||||||
| 65536* | 63* | ||||||||
| 256x256 square正方形 | 512x512 | 16 | 4 | 37* | 31.963kHz | 56.273Hz | 31.963kHz | 51.141Hz | |
| 256 | 2 | 38* | |||||||
| 65536 | 1 | 39* | |||||||
| 1024x1024 | 16 | 36* | |||||||
| 256* | 58* | ||||||||
| 65536* | 71* | ||||||||
| 384x256 | 512x512 | 16 | 4 | 29* | |||||
| 256 | 2 | 30* | |||||||
| 65536 | 1 | 31* | |||||||
| 1024x1024 | 16 | 28* | |||||||
| 256* | 56* | ||||||||
| 65536* | 69* | ||||||||
| 512x256 | 512x512 | 16 | 4 | 41* | 31.500kHz | 55.458Hz | 35.341kHz | 56.546Hz | |
| 256 | 2 | 42* | |||||||
| 65536 | 1 | 43* | |||||||
| 1024x1024 | 16 | 40* | |||||||
| 256* | 59* | ||||||||
| 65536* | 72* | ||||||||
| 512x256 SP:512x512 | 512x512 | 16 | 4 | 45* | |||||
| 256 | 2 | 46* | |||||||
| 65536 | 1 | 47* | |||||||
| 1024x1024 | 16 | 44* | |||||||
| 256* | 60* | ||||||||
| 65536* | 73* | ||||||||
| 512x512 | 512x512 | 16 | 4 | 4 | |||||
| 256 | 2 | 8 | |||||||
| 65536 | 1 | 12 | |||||||
| 1024x1024 | 16 | 0 | |||||||
| 256* | 48* | ||||||||
| 65536* | 61* | ||||||||
| 512x512 square正方形 | 512x512 | 16 | 4 | 33* | 35.056kHz | 56.090Hz | |||
| 256 | 2 | 34* | |||||||
| 65536 | 1 | 35* | |||||||
| 1024x1024 | 16 | 32* | |||||||
| 256* | 57* | ||||||||
| 65536* | 70* | ||||||||
| 768x512 | 512x512 | 256 | 2 | 20 | |||||
| 65536 | 1 | 24 | |||||||
| 1024x1024 | 16 | 16 | |||||||
| 256* | 52* | ||||||||
| 65536* | 65* | ||||||||
| 640x480 | 512x512 | 256 | 2 | 23 | 31.469kHz | 59.940Hz | LCD:VGA | ||
| 65536 | 1 | 27 | |||||||
| 1024x1024 | 16 | 19 | |||||||
| 256* | 55* | ||||||||
| 65536* | 68* | ||||||||
| 256x240 | 512x512 | 16 | 4 | 7 | 15.980kHz | 61.463Hz | 34.500kHz | 55.200Hz | LCD:read raster twiceLCD: ラスタ 2 度読み |
| 256 | 2 | 11 | |||||||
| 65536 | 1 | 15 | |||||||
| 1024x1024 | 16 | 3 | |||||||
| 256* | 51* | ||||||||
| 65536* | 64* | ||||||||
| 512x480 | 512x512 | 16 | 4 | 5 | 15.980kHz | 61.463Hz | 35.341kHz | 56.546Hz | CRT:interlaceCRT: インターレース |
| 256 | 2 | 9 | |||||||
| 65536 | 1 | 13 | |||||||
| 1024x1024 | 16 | 1 | |||||||
| 256* | 49* | ||||||||
| 65536* | 62* | ||||||||
| CRT:1024x424 LCD:768x600 | 512x512 | 256 | 2 | 21 | 24.699kHz | 53.116Hz | 35.056kHz | 56.090Hz | |
| 65536 | 1 | 25 | |||||||
| 1024x1024 | 16 | 17 | |||||||
| 256* | 53* | ||||||||
| 65536* | 66* | ||||||||
| CRT:1024x424 LCD:768x1024 | 512x512 | 256 | 2 | 22 | interlaceインターレース | ||||
| 65536 | 1 | 26 | |||||||
| 1024x1024 | 16 | 18 | |||||||
| 256* | 54* | ||||||||
| 65536* | 67* | ||||||||
Calling IOCS _CRTMOD with D1.W=$56FF returns D0.L=$16xxxxxx. IOCS _CRTMOD を D1.W=$56FF で呼び出すと D0.L=$16xxxxxx が返ります。
Calling IOCS _CRTMOD with D1.W=$16FF returns D0.L=$16xxxxxxx when the sync frequency for CRT is selected and D0.L=$96xxxxxxx when the sync frequency for LCD is selected. The difference from the call with D1.W=$56FF is that the flags for CRT and LCD are added to bit 31 of the result. IOCS _CRTMOD を D1.W=$16FF で呼び出すと、CRT 向けの同期周波数が選択されているときは D0.L=$16xxxxxx が、LCD 向けの同期周波数が選択されているときは D0.L=$96xxxxxx が返ります。D1.W=$56FF で呼び出したときとの違いは、結果のビット 31 に CRT 向けと LCD 向けのフラグが追加されていることです。
Calling IOCS _CRTMOD with D1.W=$76FF returns D0.L=$16000000+(maximum screen mode). IOCS _CRTMOD を D1.W=$76FF で呼び出すと D0.L=$16000000+(画面モードの最大値) が返ります。
There is a problem that if FSX.X is resident, the extended screen mode 28 and above cannot be used. This can be solved by not having FSX.X resident when not using SX-WINDOW, or by having crtmod16.x resident after FSX.X. FSX.X を常駐させると拡張された画面モード 28 以上が使えなくなるという問題があります。SX-WINDOW を使わないとき FSX.X を常駐させないようにするか、FSX.X の後に crtmod16.x を常駐させることで解決できます。
5. Configuration of IPLROM 1.6 IPLROM 1.6 の構成
The configuration of IPLROM 1.6 depends on whether the machine has SASI or SCSI and the parameter iplrom256k. IPLROM 1.6 は機種が SASI 内蔵機か SCSI 内蔵機かおよびパラメータ iplrom256kによって構成が変化します。
When iplrom256k=off on a machine with built-in SASI SASI 内蔵機で iplrom256k=off のとき
| addressアドレス | content内容 |
|---|---|
| $00FC0000~$00FC4EFF | ROM Debugger 1.0 |
| $00FC4F00~$00FC9FFF | 空き |
| $00FCA000~$00FCF3FF | IPL/BIOS 1.6 2nd |
| $00FCF400~$00FCFFFF | ANK6x12 |
| $00FD0000~$00FDFFFF | IPL/BIOS 1.6 1st |
| $00FE0000~$00FE4EFF | ROM Debugger 1.0 |
| $00FE4F00~$00FE9FFF | 空き |
| $00FEA000~$00FEF3FF | IPL/BIOS 1.6 2nd |
| $00FEF400~$00FEFFFF | ANK6x12 |
| $00FF0000~$00FFFFFF | IPL/BIOS 1.6 1st |
When iplrom256k=on on a machine with built-in SASI SASI 内蔵機で iplrom256k=on のとき
| addressアドレス | content内容 |
|---|---|
| $00FC0000~$00FC1FFF | empty空き |
| $00FC2000~$00FCFFFF | ROM Human 2.60 |
| $00FD0000~$00FD57FF | ROM FLOAT 2.03 |
| $00FD5800~$00FE9FFF | ROM Debugger 3.60 |
| $00FEA000~$00FEF3FF | IPL/BIOS 1.6 2nd |
| $00FEF400~$00FEFFFF | ANK6x12 |
| $00FF0000~$00FFFFFF | IPL/BIOS 1.6 1st |
When iplrom256k=off on X68000 with built-in SCSI X68000 の SCSI 内蔵機で iplrom256k=off のとき
| addressアドレス | content内容 |
|---|---|
| $00FC0000~$00FC1FFF | SCSIINROM 16 |
| $00FC2000~$00FDFFFF | 空き |
| $00FE0000~$00FE4EFF | ROM Debugger 1.0 |
| $00FE4F00~$00FE9FFF | 空き |
| $00FEA000~$00FEF3FF | IPL/BIOS 1.6 2nd |
| $00FEF400~$00FEFFFF | ANK6x12 |
| $00FF0000~$00FFFFFF | IPL/BIOS 1.6 1st |
X68030 or X68000 with built-in SCSI and iplrom256k=on X68030 または X68000 の SCSI 内蔵機で iplrom256k=on のとき
| addressアドレス | content内容 |
|---|---|
| $00FC0000~$00FC1FFF | SCSIINROM 16 |
| $00FC2000~$00FCFFFF | ROM Human 2.60 |
| $00FD0000~$00FD57FF | ROM FLOAT 2.03 |
| $00FD5800~$00FE9FFF | ROM Debugger 3.60 |
| $00FEA000~$00FEF3FF | IPL/BIOS 1.6 2nd |
| $00FEF400~$00FEFFFF | ANK6x12 |
| $00FF0000~$00FFFFFF | IPL/BIOS 1.6 1st |
6. Selecting IPLROM IPLROM の選択
For Hybrid or 060turbo, IPLROM 1.6 is always selected. For other models, use parameter iplrom16 to select IPLROM 1.6. Hybrid または 060turbo のときは常に IPLROM 1.6 が選択されます。 その他の機種のときはパラメータ iplrom16で IPLROM 1.6 を選択します。
| model機種 | iplrom16=off | iplrom16=on |
|---|---|---|
| Shodai | IPLROM 1.0 | IPLROM 1.6 |
| ACE | ||
| EXPERT | ||
| PRO | ||
| SUPER | ||
| XVI | IPLROM 1.1 | |
| Xellent30 | ||
| Compact | IPLROM 1.2 | |
| X68030 | IPLROM 1.3 | |
| 030Compact | ||
| Hybrid | IPLROM 1.6 | |
| 060turbo | ||
| 060turboPRO | ||
7. Building ROM ROM の構築
The ROM is created by combining CGROM_XEiJ.DAT loaded from resources, SCSIINROM 16 if necessary, and the selected IPLROM. If parameter rom, parameter cgrom, parameter rom30, parameter scsiinrom, and parameter iplrom are specified, they are overwritten to the ROM in this order. The finished ROM is used as is, without any patches to fix bugs. リソースから読み込んだ CGROM_XEiJ.DAT と、必要ならば SCSIINROM 16 と、選択された IPLROM を組み合わせて、ROM が作られます。 パラメータ rom、パラメータ cgrom、パラメータ rom30、パラメータ scsiinrom、パラメータ iplrom が指定されているときは、それらをこの順に ROM に上書きします。 完成した ROM はそのまま使用され、バグを修正するパッチなどは当てられません。
8. Model name and model code 機種名と機種コード
The model name and model code are placed at the end of IPLROM 1.6. IPLROM 1.6 の末尾に機種名と機種コードが入ります。
| common name 通称 | CZ name CZ 名 | model name 機種名 ($00FFFFE4-) | model code 機種コード ($00FFFFFF) |
|---|---|---|---|
| Shodai | CZ-600CE | X68000 | $00 |
| CZ-600CB | $03 | ||
| CZ-601C-BK | X68000 ACE | $13 | |
| ACE | CZ-601C-GY | $11 | |
| CZ-611C-BK | X68000 ACE HD | $17 | |
| CZ-611C-GY | $15 | ||
| EXPERT | CZ-602C-BK | X68000 EXPERT | $23 |
| CZ-602C-GY | $21 | ||
| CZ-612C-BK | X68000 EXPERT HD | $27 | |
| CZ-652C-BK | X68000 PRO | $33 | |
| PRO | CZ-652C-GY | $31 | |
| CZ-662C-BK | X68000 PRO HD | $37 | |
| CZ-662C-GY | $35 | ||
| EXPERTII | CZ-603C-BK | X68000 EXPERTII | $2B |
| CZ-603C-GY | $29 | ||
| CZ-613C-BK | X68000 EXPERTII HD | $2F | |
| CZ-653C-BK | X68000 PROII | $3B | |
| PROII | CZ-653C-GY | $39 | |
| CZ-663C-BK | X68000 PROII HD | $3F | |
| CZ-663C-GY | $3D | ||
| CZ-623C-TN | X68000 SUPER HD | $46 | |
| SUPER | CZ-604C-TN | X68000 SUPER | $42 |
| XVI | CZ-634C-TN | X68000 XVI | $52 |
| CZ-644C-TN | X68000 XVI HD | $56 | |
| Compact | CZ-674C-H | X68000 Compact | $61 |
| X68030 | CZ-500C-B | X68030 | $82 |
| CZ-510C-B | X68030 HD | $86 | |
| 030Compact | CZ-300C-B | X68030 Compact | $E2 |
| CZ-310C-B | X68030 Compact HD | $E6 |
9. How to use IPLROM 1.6 on real machines or other X68000 emulators 実機または他の X68000 エミュレータで IPLROM 1.6 を使う方法
IPLROM 1.6 is a patched version of IPLROM 1.3. IPLROM 1.3 is available free of charge, but due to restrictions in the license agreement, it cannot be distributed with patches applied. Therefore, XEiJ has a mechanism to create IPLROM 1.6 by patching it in memory each time it is started. Users can use IPLROM 1.6 on the actual machine or other X68000 emulators within the scope of personal use by extracting data from a running XEiJ. IPLROM 1.6 は IPLROM 1.3 にパッチをあてたものです。IPLROM 1.3 は無償公開されていますが、許諾条件による制約で、パッチをあてた状態で配布することができません。 そこで、XEiJ は起動する度にメモリ上でパッチをあてて IPLROM 1.6 を作る仕組みになっています。 ユーザーは、動作中の XEiJ からデータを取り出すことで、個人的な使用の範囲内で、実機または他の X68000 エミュレータで IPLROM 1.6 を使うことができます。
Parameters パラメータ
As noted in the Configuration of IPLROM 1.6 section, the IPLROM 1.6 configuration changes depending on the type of internal hard disk interface and the size of the IPLROM. When retrieving IPLROM 1.6 data from XEiJ, it is necessary to match the IPLROM 1.6 configuration with the environment in which it will be used. You can adjust the configuration in the menu after starting XEiJ, but it is less likely to make a mistake if you start XEiJ by specifying the parameters. IPLROM 1.6 の構成の章に書いたように、IPLROM 1.6 は内蔵ハードディスクインターフェイスの種類と IPLROM のサイズによって構成が変化します。XEiJ から IPLROM 1.6 のデータを取り出すときは、使用する環境と IPLROM 1.6 の構成を合致させる必要があります。XEiJ の起動後にメニューで調整することもできますが、パラメータを指定して XEiJ を起動する方が間違いが起こりにくいと思います。
-ini=xeijtemp.ini
Switch to a temporary configuration file. Do not affect the XEiJ environment in use. 一時的な設定ファイルに切り替えます。 使用中の XEiJ の環境に影響を及ぼさないようにします。
-config=default
Use the default settings. Do not be affected by the presence of temporary configuration files. 初期設定を使います。 一時的な設定ファイルが存在していても影響を受けないようにします。
-saveonexit=off
Do not write to the temporary configuration file. 一時的な設定ファイルに書き込みません。
-model=~
Refer to the description of the parameter model to specify as accurately as possible the environment in which IPLROM 1.6 will be used. パラメータ modelの説明を参考にして、IPLROM 1.6 を使用する環境を指定します。
-iplrom16=on
Instructs to use IPLROM 1.6 instead of IPLROM 1.0/1.1/1.2/1.3. IPLROM 1.0/1.1/1.2/1.3 の代わりに IPLROM 1.6 を使うことを指示します。
-iplrom256k=on
Change 128KB IPLROM 1.0/1.1/1.2 to 256KB IPLROM 1.6. Specify when installing 256 KB ROM on the internal expansion memory board on XVI or Compact real machines. Reference: えくしみえむ 資料館 128KB の IPLROM 1.0/1.1/1.2 を 256KB の IPLROM 1.6 に変更します。XVI または Compact の実機で内部増設用メモリボードに 256KB の ROM を載せる場合に指定します。 参考 : えくしみえむ 資料館
-memory=~
Specify the size of main memory in megabytes that will be written to SRAM when SRAM is initialized. Even if the size does not match, it can be corrected at startup, but if it is set to the correct size, it will not be necessary to correct the size each time the SRAM is initialized. If not specified, it will be the default size of the model. SRAM を初期化したとき SRAM に書き込まれるメインメモリのサイズをメガバイト単位で指定します。 サイズが合っていなくても起動時に修正できますが、合わせておけば SRAM を初期化する度に修正する必要がなくなります。 指定しなければ機種のデフォルトのサイズになります。
-cgrom=CGROM30.DAT
In the case of X68030, the CGROM and IPLROM are to be replaced at the same time, so CGROM data taken from the actual machine is required. Prepare CGROM30.DAT by referring to how to create CGROM30.DAT. X68030 の場合は CGROM と IPLROM を同時に交換することになるので、実機から取り出した CGROM のデータが必要です。 CGROM30.DAT の作り方を参照して CGROM30.DAT を用意します。
-iplrom16style=~
Change the style of the IPLROM 1.6 startup screen. Specify proportional pitch as 1, centered as 2, and with gaps as 4, and the total of these. The default is 7. IPLROM 1.6 の起動画面のスタイルを変更します。 プロポーショナルピッチを 1、中央寄せを 2、隙間ありを 4 として、それらの合計を指定します。 デフォルトは 7 です。
Example: In case of X68000 first generation/ACE/EXPERT/PRO/EXPERT II/PRO II 例 : X68000 初代 /ACE/EXPERT/PRO/EXPERT II/PRO II の場合
Start XEiJ with the following settings. Specify the model with -model. XEiJ を以下の設定で起動します。-model で機種を指定します。
$ java --enable-native-access=ALL-UNNAMED -jar XEiJ.jar -ini=xeijtemp.ini -config=default -saveonexit=off -model=Shodai -iplrom16=on -memory=12
$ java --enable-native-access=ALL-UNNAMED -jar XEiJ.jar -ini=xeijtemp.ini -config=default -saveonexit=off -model=ACE -iplrom16=on -memory=12
$ java --enable-native-access=ALL-UNNAMED -jar XEiJ.jar -ini=xeijtemp.ini -config=default -saveonexit=off -model=EXPERT -iplrom16=on -memory=12
$ java --enable-native-access=ALL-UNNAMED -jar XEiJ.jar -ini=xeijtemp.ini -config=default -saveonexit=off -model=PRO -iplrom16=on -memory=12
$ java --enable-native-access=ALL-UNNAMED -jar XEiJ.jar -ini=xeijtemp.ini -config=default -saveonexit=off -model=EXPERTII -iplrom16=on -memory=12
$ java --enable-native-access=ALL-UNNAMED -jar XEiJ.jar -ini=xeijtemp.ini -config=default -saveonexit=off -model=PROII -iplrom16=on -memory=12
For real machines 実機で使う場合
Create EVENPRO.BIN and ODDPRO.BIN in the create ROM file menu. Burn them into 64Kbitx8=512Kbit (64KB) EEPROM respectively. Insert them into the motherboard socket and switch the jumpers in case of PRO. ROM ファイルの作成メニューで EVENPRO.BIN と ODDPRO.BIN を作ります。 それぞれ 64Kbitx8=512Kbit(64KB) の EEPROM に焼きます。 マザーボードのソケットに挿して PRO の場合はジャンパを切り替えます。
For other X68000 emulators 他の X68000 エミュレータで使う場合
Create XEIJIPLROM.DAT in the create ROM file menu. Rename XEIJIPLROM.DAT to IPLROM.DAT. ROM ファイルの作成メニューで XEIJIPLROM.DAT を作ります。XEIJIPLROM.DAT を IPLROM.DAT にリネームします。
Example: In case of X68000 SUPER/XVI 例 : X68000 SUPER/XVI の場合
Start XEiJ with the following settings. Specify the model with -model. XEiJ を以下の設定で起動します。-model で機種を指定します。
$ java --enable-native-access=ALL-UNNAMED -jar XEiJ.jar -ini=xeijtemp.ini -config=default -saveonexit=off -model=SUPER -iplrom16=on -iplrom256k=on -memory=12
$ java --enable-native-access=ALL-UNNAMED -jar XEiJ.jar -ini=xeijtemp.ini -config=default -saveonexit=off -model=XVI -iplrom16=on -iplrom256k=on -memory=12
For real machines 実機で使う場合
Create EVENXVI.BIN and ODDXVI.BIN in the create ROM file menu. Burn them into 128Kbitx8=1Mbit (128KB) EEPROM respectively. In case of SUPER, see えくしみえむ 資料館. In case of XVI, insert them into the CZ-6BE2A socket and switch the jumpers. See えくしみえむ 資料館 for XM-6BE6AP. ROM ファイルの作成メニューで EVENXVI.BIN と ODDXVI.BIN を作ります。 それぞれ 128Kbitx8=1Mbit(128KB) の EEPROM に焼きます。SUPER の場合はえくしみえむ 資料館を参照してください。XVI の場合は CZ-6BE2A のソケットに取り付けてジャンパを切り替えます。XM-6BE6AP についてはえくしみえむ 資料館を参照してください。
For other X68000 emulators 他の X68000 エミュレータで使う場合
Create XEIJIPLROM.DAT and XEIJSCSIINROM.DAT in the create ROM file menu. Rename XEIJIPLROM.DAT to IPLROM.DAT and XEIJSCSIINROM.DAT to SCSIINROM.DAT. ROM ファイルの作成メニューで XEIJIPLROM.DAT と XEIJSCSIINROM.DAT を作ります。XEIJIPLROM.DAT を IPLROM.DAT に、XEIJSCSIINROM.DAT を SCSIINROM.DAT にリネームします。
Example: In case of X68030 or 060turbo 例 : X68030 または 060turbo の場合
Start XEiJ with the following settings. XEiJ を以下の設定で起動します。
$ java --enable-native-access=ALL-UNNAMED -jar XEiJ.jar -ini=xeijtemp.ini -config=default -saveonexit=off -model=X68030 -iplrom16=on -memory=12 -cgrom=CGROM30.DAT
For real machines 実機で使う場合
Create EVEN030.BIN and ODD030.BIN in the create ROM file menu. Burn them into 256Kbitx16=4Mbit (512KB) EEPROM respectively. Insert them into the motherboard socket and switch the jumpers. ROM ファイルの作成メニューで EVEN030.BIN と ODD030.BIN を作ります。 それぞれ 256Kbitx16=4Mbit (512KB) の EEPROM に焼きます。 マザーボードのソケットに挿してジャンパを切り替えます。
For other X68000 emulators 他の X68000 エミュレータで使う場合
Create XEIJROM30.DAT and XEIJIPLROM.DAT in the create ROM file menu. Rename XEIJROM30.DAT to ROM30.DAT and XEIJIPLROM.DAT to IPLROM30.DAT. ROM ファイルの作成メニューで XEIJROM30.DAT と XEIJIPLROM.DAT を作ります。XEIJROM30.DAT を ROM30.DAT に、XEIJIPLROM.DAT を IPLROM30.DAT にリネームします。
The reason why the first half XEIJROM30.DAT and the second half XEIJIPLROM30.DAT can be separately retrieved is to facilitate replacement from ROM30.DAT and IPLROM30.DAT, not to allow only half to be replaced. When updating, be sure to update the first half and the second half at the same time. 前半の XEIJROM30.DAT と後半の XEIJIPLROM30.DAT に分けて取り出せるようになっているのは、ROM30.DAT と IPLROM30.DAT からの置き換えを容易にするためであって、半分だけ置き換えられるようにするためではありません。 更新するときは必ず前半と後半を同時に更新してください。
10. How to create CGROM30.DAT CGROM30.DAT の作り方
CGROMs are not released free of charge and cannot be distributed, so if users want to use the same fonts as the actual device on the X68000 emulator, they must save the CGROM of the actual device in a file and bring it to the X68000 emulator themselves. The CGROM of the actual X68000 device saved in a file is called CGROM.DAT, and the CGROM of the X68030 device saved in a file is called CGROM30.DAT. The only difference between CGROM.DAT and CGROM30.DAT is the addition of ANK6x12. Since ANK6x12 is included in IPLROM even for X68000, CGROM30.DAT can be created even without an actual X68030 if you have an actual X68000. The procedure is partially different because the address of ANK6x12 is different depending on the model, but the contents of the CGROM30.DAT you can create are the same. CGROM は無償公開されておらず配布することができないので、X68000 エミュレータで実機と同じフォントを使いたければユーザーが自分で実機の CGROM をファイルに保存して持ってこなければなりません。X68000 の実機の CGROM をファイルに保存したものを CGROM.DAT、X68030 の実機の CGROM をファイルに保存したものを CGROM30.DAT と呼びます。CGROM.DAT と CGROM30.DAT の違いは ANK6x12 が追加されたことだけです。X68000 でも IPLROM に ANK6x12 が含まれているので、X68030 の実機がなくても X68000 の実機があれば CGROM30.DAT を作ることができます。 機種によって ANK6x12 のアドレスが違うため手順が一部違いますが、できる CGROM30.DAT の内容は同じです。
When X68000 (first generation) real machine (IPLROM 1.0 (1987-03-18)) is available X68000(初代) の実機 (IPLROM 1.0 (1987-03-18)) があるとき
>db.x
-w P1,F00000 LBF400
-w P2,FFCFF6 LBE8
-w P3,FBFFE8 L18
-q
>copy /b P1+P2+P3 CGROM30.DAT
When X68000 ACE/EXPERT/PRO/SUPER real machine (IPLROM 1.0 (1987-05-07)) is available X68000 ACE/EXPERT/PRO/SUPER の実機 (IPLROM 1.0 (1987-05-07)) があるとき
>db.x
-w P1,F00000 LBF400
-w P2,FFD018 LBE8
-w P3,FBFFE8 L18
-q
>copy /b P1+P2+P3 CGROM30.DAT
When X68000 XVI real machine (IPLROM 1.1) is available X68000 XVI の実機 (IPLROM 1.1) があるとき
>db.x
-w P1,F00000 LBF400
-w P2,FFD344 LBE8
-w P3,FBFFE8 L18
-q
>copy /b P1+P2+P3 CGROM30.DAT
When X68000 Compact real machine (IPLROM 1.2) available X68000 Compact の実機 (IPLROM 1.2) があるとき
>db.x
-w P1,F00000 LBF400
-w P2,FFD45E LBE8
-w P3,FBFFE8 L18
-q
>copy /b P1+P2+P3 CGROM30.DAT
When X68030 real machine (IPLROM 1.3) is available X68030 の実機 (IPLROM 1.3) があるとき
>db.x
-w CGROM30.DAT,F00000 LC0000
-q